背景 写 Android 原生代码写的太多,不管是官方的内存优化 Best Practice 中的建议,还是 IDE 中的 Lint 提示,大家在用到 Map 数据结构的时候都会下意识的使用 ArrayMap 或者在 Key 为 int/long 的时候使用 SparseArray/LongSparseArray。
但是这两种数据结构究竟是因为什么被官方推荐使用?我们是不是在任何情况下都可以无条件的使用这些数据结构呢?我们再一起回过头来复习一下源码。
注:下述的源码都来自 support v4 包。
SparseArray SparseArray 将 int 作为 key 来完成对 Object 的索引,因为避免了 int 的自动装箱以及在存储过程中的额外对象开销而具有更高的内存效率。
在一个 SparseArray 对象中,主要由以下几个数据结构完成 Map 的相关功能:
1
2
3
private int [] mKeys;private Object[] mValues; private int mSize;
在 SparseArray 对象创建的时候接受一个容量参数,这个参数经过调整后会作为 mKeys 和 mValues 的初始大小。调整过程如下:
1
2
3
4
5
6
7
public static int idealByteArraySize (int need) for (int i = 4 ; i < 32 ; i++) if (need <= (1 << i) - 12 ) return (1 << i) - 12 ; return need; }
因此初始化大小只能是 4、20、52、116、244…… 这么几个大小,这里稍微有点没看明白为什么 -12,这个之后再研究一下。
对于一个 Map 对象,操作无非就是增删改查,而在这些方法中,又以 put 方法涉及到的内部操作最为复杂,我们这里就以 put 方法为引子来看一下它们内部实现的细节:
1
2
3
4
5
6
7
8
9
10
11
12
13
14
15
16
17
18
19
20
21
22
23
24
25
26
27
28
29
30
31
32
33
34
35
36
37
38
39
40
41
42
43
44
45
46
47
48
49
50
51
52
53
54
55
56
public void put (int key, E value) int i = ContainerHelpers.binarySearch(mKeys, mSize, key); if (i >= 0 ) { mValues[i] = value; } else { i = ~i; if (i < mSize && mValues[i] == DELETED) { mKeys[i] = key; mValues[i] = value; return ; } if (mGarbage && mSize >= mKeys.length) { gc(); i = ~ContainerHelpers.binarySearch(mKeys, mSize, key); } if (mSize >= mKeys.length) { int n = ContainerHelpers.idealIntArraySize(mSize + 1 ); int [] nkeys = new int [n]; Object[] nvalues = new Object[n]; System.arraycopy(mKeys, 0 , nkeys, 0 , mKeys.length); System.arraycopy(mValues, 0 , nvalues, 0 , mValues.length); mKeys = nkeys; mValues = nvalues; } if (mSize - i != 0 ) { System.arraycopy(mKeys, i, mKeys, i + 1 , mSize - i); System.arraycopy(mValues, i, mValues, i + 1 , mSize - i); } mKeys[i] = key; mValues[i] = value; mSize++; } }
简单分析一下:
SparseArray 内部是两个相同长度的数组 mKeys 和 mValues,mKeys 中按照升序存储 key 值,mValues 在对应的位置存放 value 值。
ContainerHelpers.binarySearch 返回的结果包含两层含义:
结果为非负值,代表查找到了对应的内容,位置在该 index 下
结果为负值,代表查找内容失败,对该负 index 求反,即为该值应该所处的位置,也即应该插入的位置
所以我们只需要做一次查找,就可以得到两种情况下我们所需要的 index 值,非常高效、简洁。
当插入内容时,如果发现 value 值为 DELETED,那么直接就写入内容,这其实是之后会提到的,SparseArray 在删除节点时做的一种优化,即 SparseArray 再删除元素时不会立即清理 key-value 数组,而是将被删除的节点进行标记,如果在下一次扩容、缩容之前在这些位置有写入动作,那么可以直接对相应位置上的 value 进行赋值,减少了许多扩容缩容的性能开销。
为了能说明白这个 DELETE 标志位,这里先来简单看一下 delete 方法是如何实现的:
1
2
3
4
5
6
7
8
9
10
public void delete (int key) int i = ContainerHelpers.binarySearch(mKeys, mSize, key); if (i >= 0 ) { if (mValues[i] != DELETED) { mValues[i] = DELETED; mGarbage = true ; } } }
很简单,就是将该位置上的 value 置为 DELETED,没有任何多余的数组操作,这也是 SparseArray 的一个简单的性能优化。
当 mGarbage 为 true,并且表征数组容量的值 mSize 大于 key-value 数组大小时,SparseArray 会进行一次 gc 操作,接下来我们再来看一下这个 gc 方法:
1
2
3
4
5
6
7
8
9
10
11
12
13
14
15
16
17
18
19
20
21
22
23
private void gc () int n = mSize; int o = 0 ; int [] keys = mKeys; Object[] values = mValues; for (int i = 0 ; i < n; i++) { Object val = values[i]; if (val != DELETED) { if (i != o) { keys[o] = keys[i]; values[o] = val; values[i] = null ; } o++; } } mGarbage = false ; mSize = o; }
很简单,实际上就是把 key 数组和 value 数组中的有效内容挪到一块儿去,然后更新 mSize 值,并将 mGarbage 变量置为 true。这里可以看到,虽然执行的是 delete 操作,但是内部其实并没有涉及到数组的扩缩容,实际上如果不进行后续的其他操作的话,只调用 delete 方法是永远不会触发数组操作的。
从代码中可以看出,每次 put 操作大概率会触发一次 arrayCopy,数组容量越大,每一次 put 操作触发 arrayCopy 的概率越高,每次 arrayCopy 的开销也就越大,这也是为什么 SparseArray 在处理大容量数据时性能急剧下降的原因之一。
另一个影响 SparseArray 在大数据量情况下性能的原因在于,由于搜索 key 值时是通过二分查找完成的,相比于 HashMap 直接通过散列算法得到 index 值,在数据量非常大的时候,性能差异会非常明显,用 SparseArray 官方文档中的阐述来说就是:
Note that this container keeps its mappings in an array data structure, sing a binary search to find keys. The implementation is not intended to be appropriate for data structures that may contain large numbers of items. It is generally slower than a traditional HashMap, since lookups require a binary search and adds and removes require inserting and deleting entries in the array. For containers holding up to hundreds of items, the performance difference is not significant, less than 50%.
仔细看代码,有个问题之前一直没注意到,就是 key-value 数组似乎没有缩容的过程:整个代码里实际上 mKeys 数组只在三个地方赋值过,一个是初始化,另外两处则是分别在 put 和 append 方法中,当 mSize 大于 mKeys.length 时,会重新生成一个长度为 ContainerHelpers.idealIntArraySize(mSize + 1) 的一个新数组赋值给 mKeys。这也就意味着,mKeys 数组的长度其实是一直在递增的,在整个逻辑里面就没有缩容的步骤,一旦在 SparseArray 的生命周期中装载过高量数据,哪怕后来将数据都清空,在 SparseArray 对象中依然会保留两个非常长的数组,这是我读源码前并没有意识到的问题。
在整个源码中,几乎看不到有控制同步的代码,也就是说这个数据结构本身是线程不安全的,多线程同时存取同一个 sparseArray 对象可能会造成数据混乱,大家用的时候记得自己控制同步。
到这里其实 SparseArray 就已经分析的差不多了,剩余的各种 index 相关方法、get 方法实际上就是简单的数组操作、二分查找等等,这里就不展开去讲了。那么稍微总结一下,SparseArray 的优缺点:
优点:
采用基本类型 int 作为 key,避免 HashMap 中对基本类型的拆装箱操作
内部采用数组实现 key-value pair,避免构造冗余的数据结构,提升内存利用效率
删除元素时使用标志位标记可用位置,避免无效数组操作
内部没有同步控制,避免额外的同步开销,但实际上只是将线程安全问题转交给了使用者
缺点:
在大数据量情况下,key 索引采用二分查找,效率低于 hashmap,并且在这种情况下,插入操作涉及大量数组操作,效率低下
没有缩容操作,内部的数组对象可能存在不合理分配的空间
ArrayMap ArrayMap 是另一个被 Google 官方推荐在 Android 平台使用的 Map 数据结构。从继承结构来看,它实际上起作用的代码只在它的父类 SimpleArrayMap 中,ArrayMap 只是一个实现了 Map 接口的包装类,那么下面我们就来看一下这个 SimpleArrayMap 的内部是怎样的一个实现。
照例来看看最终起作用的几个内部变量:
1 2 3 4 5 6 7 8 9 10 11 12 13 14 15 16 17 18 19 private static final boolean CONCURRENT_MODIFICATION_EXCEPTIONS = true ;private static final int BASE_SIZE = 4 ;private static final int CACHE_SIZE = 10 ;static Object[] mBaseCache;static int mBaseCacheSize;static Object[] mTwiceBaseCache;static int mTwiceBaseCacheSize;int [] mHashes;Object[] mArray; int mSize;
我们从构造函数开始看起:
1
2
3
4
5
6
7
8
9
public SimpleArrayMap (int capacity) if (capacity == 0 ) { mHashes = ContainerHelpers.EMPTY_INTS; mArray = ContainerHelpers.EMPTY_OBJECTS; } else { allocArrays(capacity); } mSize = 0 ; }
当初始容量不为 0 的时候,会调用 allocArray 方法来为 mHashes 数组和 mArrays 数组分配长度:
1
2
3
4
5
6
7
8
9
10
11
12
13
14
15
16
17
18
19
20
21
22
23
24
25
26
27
28
29
30
private void allocArrays (final int size) if (size == (BASE_SIZE*2 )) { synchronized (ArrayMap.class) { if (mTwiceBaseCache != null ) { final Object[] array = mTwiceBaseCache; mArray = array; mTwiceBaseCache = (Object[])array[0 ]; mHashes = (int [])array[1 ]; array[0 ] = array[1 ] = null ; mTwiceBaseCacheSize--; return ; } } } else if (size == BASE_SIZE) { synchronized (ArrayMap.class) { if (mBaseCache != null ) { final Object[] array = mBaseCache; mArray = array; mBaseCache = (Object[])array[0 ]; mHashes = (int [])array[1 ]; array[0 ] = array[1 ] = null ; mBaseCacheSize--; return ; } } } mHashes = new int [size]; mArray = new Object[size<<1 ]; }
简单来讲,这段代码的意思是,当 size 为 BASE SIZE 或 2 倍 BASE SIZE 的时候,会尝试从 SimpleArrayMap.mBaseCache 或 SimpleArrayMap.mTwiceBaseCache 这两个链表中去找已经存在的该尺寸的数组缓存进行复用,如果尺寸不匹配或没有找到,那么就直接新建两个数组,分别赋值给 mHashes 和 mArray,尺寸为 size 和 2*size。
所以 allocArray(n) 方法其实就是尝试从缓存里为 mHashes 和 mArray 变量找到需要尺寸的数组,如果找不到或者是尺寸不匹配,那么就直接新建数组赋值给 mHashes 和 mArray。
有 alloc 当然就有 free,我们继续来看这个 freeArray 方法:
1
2
3
4
5
6
7
8
9
10
11
12
13
14
15
16
17
18
19
20
21
22
23
24
25
26
27
private static void freeArrays (final int [] hashes, final Object[] array, final int size) if (hashes.length == (BASE_SIZE*2 )) { synchronized (ArrayMap.class) { if (mTwiceBaseCacheSize < CACHE_SIZE) { array[0 ] = mTwiceBaseCache; array[1 ] = hashes; for (int i=(size<<1 )-1 ; i>=2 ; i--) { array[i] = null ; } mTwiceBaseCache = array; mTwiceBaseCacheSize++; } } } else if (hashes.length == BASE_SIZE) { synchronized (ArrayMap.class) { if (mBaseCacheSize < CACHE_SIZE) { array[0 ] = mBaseCache; array[1 ] = hashes; for (int i=(size<<1 )-1 ; i>=2 ; i--) { array[i] = null ; } mBaseCache = array; mBaseCacheSize++; } } } }
这个方法也很简单:当需要回收的数组长度为 BASE SIZE 或 2 倍 BASE SIZE 时,清空数组,将这些需要回收的 array 数组作为链表头,array 数组中位置 0 存放下一个缓存的 array 数组对象,位置 1 存放 hashes 数组,赋值给对应的缓存数组对象。
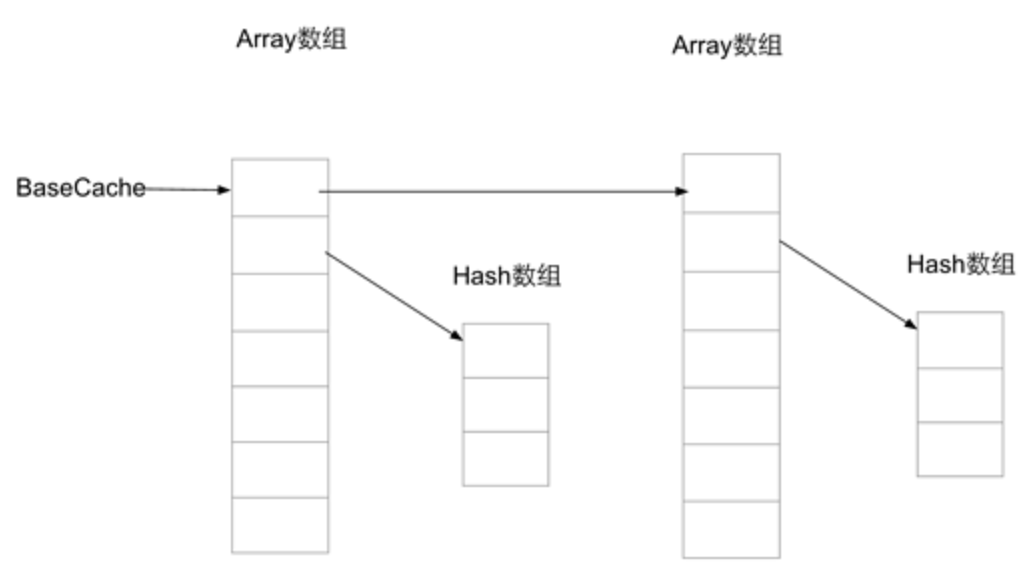
所以说,整个缓存的数据结构是这样的:
了解完 alloc 和 free 方法之后,实际上 ArrayMap 在内存上的第一个优化点已经呼之欲出了:通过对尺寸 4 和尺寸 8 的数组进行链式缓存,当 arrayMap 内部需要扩容、缩容的时候可以减少对于数组对象的创建、回收操作。
我们继续来看 get 方法:
1
2
3
4
5
6
7
8
9
10
11
12
13
14
15
16
17
18
19
20
21
22
23
24
25
26
27
28
29
30
31
32
33
34
35
36
37
38
39
40
41
42
43
44
45
46
47
public V get (Object key) final int index = indexOfKey(key); return index >= 0 ? (V) mArray[(index << 1 ) + 1 ] : null ; } public int indexOfKey (Object key) return key == null ? indexOfNull() : indexOf(key, key.hashCode()); } int indexOf (Object key, int hash) final int N = mSize; if (N == 0 ) { return ~0 ; } int index = binarySearchHashes(mHashes, N, hash); if (index < 0 ) { return index; } if (key.equals(mArray[index << 1 ])) { return index; } int end; for (end = index + 1 ; end < N && mHashes[end] == hash; end++) { if (key.equals(mArray[end << 1 ])) return end; } for (int i = index - 1 ; i >= 0 && mHashes[i] == hash; i--) { if (key.equals(mArray[i << 1 ])) return i; } return ~end; }
我们可以看到,我们会首先通过 key 计算 hash,然后在 mHashes 数组中查找 hash 的位置 index,而对应的 key-value 则存放在 2 * index 和 2 * index+1 的位置上。
由于 hash 可能碰撞,因此当 hash 相同时,需要比对 key 值,这里通过前向后向两次遍历找到匹配的 key 值。如果 key 匹配,那么能够在相应的位置找到 value,否则返回负值表征查找失败。
在这里实际上可以画出 ArrayMap 的内部数据结构了:
并且我们可以看到,查找 hash 时用到了二分查找,在比对 key 时又是线性遍历,因此查找性能在数据量很大的时候,效率是跟 hashmap 不能相提并论的。
我们继续来看 put 方法:
1
2
3
4
5
6
7
8
9
10
11
12
13
14
15
16
17
18
19
20
21
22
23
24
25
26
27
28
29
30
31
32
33
34
35
36
37
38
39
40
41
42
43
44
45
46
47
48
49
50
51
52
53
54
55
56
57
58
59
60
61
62
63
64
65
66
67
68
69
70
public V put (K key, V value) final int osize = mSize; final int hash; int index; if (key == null ) { hash = 0 ; index = indexOfNull(); } else { hash = key.hashCode(); index = indexOf(key, hash); } if (index >= 0 ) { index = (index << 1 ) + 1 ; final V old = (V) mArray[index]; mArray[index] = value; return old; } index = ~index; if (osize >= mHashes.length) { final int n = osize >= (BASE_SIZE * 2 ) ? (osize + (osize >> 1 )) : (osize >= BASE_SIZE ? (BASE_SIZE * 2 ) : BASE_SIZE); final int [] ohashes = mHashes; final Object[] oarray = mArray; allocArrays(n); if (CONCURRENT_MODIFICATION_EXCEPTIONS && osize != mSize) { throw new ConcurrentModificationException(); } if (mHashes.length > 0 ) { System.arraycopy(ohashes, 0 , mHashes, 0 , ohashes.length); System.arraycopy(oarray, 0 , mArray, 0 , oarray.length); } freeArrays(ohashes, oarray, osize); } if (index < osize) { System.arraycopy(mHashes, index, mHashes, index + 1 , osize - index); System.arraycopy(mArray, index << 1 , mArray, (index + 1 ) << 1 , (mSize - index) << 1 ); } if (CONCURRENT_MODIFICATION_EXCEPTIONS) { if (osize != mSize || index >= mHashes.length) { throw new ConcurrentModificationException(); } } mHashes[index] = hash; mArray[index << 1 ] = key; mArray[(index << 1 ) + 1 ] = value; mSize++; return null ; }
在 put 方法中抛开查找相关的逻辑,最值得注意的就是扩容相关的逻辑。我们可以看到,内部数组在扩容的时候,hash 数组尺寸是按照 4,8,12,18,27…… 这样的数列递增的,并且会在尺寸为 4 和 8 的时候进行数组复用、回收。数组最终也是通过 System.arrayCopy 来完成数据搬移。由于涉及到的数组操作比较多——每次搬移两个数组,其中一个是另一个容量的两倍——因此在大数据量情况下,性能会下降的比较明显。
最后我们再看看 remove 方法:
1
2
3
4
5
6
7
8
9
10
11
12
13
14
15
16
17
18
19
20
21
22
23
24
25
26
27
28
29
30
31
32
33
34
35
36
37
38
39
40
41
42
43
44
45
46
47
48
49
50
51
52
53
54
55
56
57
58
59
60
61
62
63
64
65
66
67
public V remove (Object key) final int index = indexOfKey(key); if (index >= 0 ) { return removeAt(index); } return null ; } public V removeAt (int index) final Object old = mArray[(index << 1 ) + 1 ]; final int osize = mSize; final int nsize; if (osize <= 1 ) { freeArrays(mHashes, mArray, osize); mHashes = ContainerHelpers.EMPTY_INTS; mArray = ContainerHelpers.EMPTY_OBJECTS; nsize = 0 ; } else { nsize = osize - 1 ; if (mHashes.length > (BASE_SIZE * 2 ) && mSize < mHashes.length / 3 ) { final int n = osize > (BASE_SIZE * 2 ) ? (osize + (osize >> 1 )) : (BASE_SIZE * 2 ); final int [] ohashes = mHashes; final Object[] oarray = mArray; allocArrays(n); if (CONCURRENT_MODIFICATION_EXCEPTIONS && osize != mSize) { throw new ConcurrentModificationException(); } if (index > 0 ) { System.arraycopy(ohashes, 0 , mHashes, 0 , index); System.arraycopy(oarray, 0 , mArray, 0 , index << 1 ); } if (index < nsize) { System.arraycopy(ohashes, index + 1 , mHashes, index, nsize - index); System.arraycopy(oarray, (index + 1 ) << 1 , mArray, index << 1 , (nsize - index) << 1 ); } } else { if (index < nsize) { System.arraycopy(mHashes, index + 1 , mHashes, index, nsize - index); System.arraycopy(mArray, (index + 1 ) << 1 , mArray, index << 1 , (nsize - index) << 1 ); } mArray[nsize << 1 ] = null ; mArray[(nsize << 1 ) + 1 ] = null ; } } if (CONCURRENT_MODIFICATION_EXCEPTIONS && osize != mSize) { throw new ConcurrentModificationException(); } mSize = nsize; return (V) old; }
在这里可以看到,ArrayMap 在删除元素的时候会对过大的数组进行缩容,释放空间。并且在删除的过程中实际上也是数组的整体搬移拷贝,在大数据量情况下,操作效率依然不高。
在读源码的时候,发现 SimpleArrayMap 的 equals 方法挺有趣:
1
2
3
4
5
6
7
8
9
10
11
12
13
14
15
16
17
18
19
20
21
22
23
24
25
26
27
28
29
30
31
32
33
34
35
36
37
38
39
40
41
42
43
44
45
46
47
48
49
50
51
52
53
54
55
56
57
58
@Override public boolean equals (Object object) if (this == object) { return true ; } if (object instanceof SimpleArrayMap) { SimpleArrayMap<?, ?> map = (SimpleArrayMap<?, ?>) object; if (size() != map.size()) { return false ; } try { for (int i=0 ; i<mSize; i++) { K key = keyAt(i); V mine = valueAt(i); Object theirs = map.get(key); if (mine == null ) { if (theirs != null || !map.containsKey(key)) { return false ; } } else if (!mine.equals(theirs)) { return false ; } } } catch (NullPointerException ignored) { return false ; } catch (ClassCastException ignored) { return false ; } return true ; } else if (object instanceof Map) { Map<?, ?> map = (Map<?, ?>) object; if (size() != map.size()) { return false ; } try { for (int i=0 ; i<mSize; i++) { K key = keyAt(i); V mine = valueAt(i); Object theirs = map.get(key); if (mine == null ) { if (theirs != null || !map.containsKey(key)) { return false ; } } else if (!mine.equals(theirs)) { return false ; } } } catch (NullPointerException ignored) { return false ; } catch (ClassCastException ignored) { return false ; } return true ; } return false ; }
可以看到,虽然 SimpleArrayMap 实际上并不是一个严格的实现了 Map 接口的类,但是在 equals 方法中依然对实现了 Map 接口的参数进行了支持,并且 SimpleArrayMap.equals(map) = true 的条件仅仅是包含的 key-value 完全一致即可,并不要求顺序一致,实际上由前文我们可以知道,在 Hash 碰撞的情况下,根据添加顺序的不同,array 数组中 key-value 的排列顺序其实是可能不一致的,但是这并不影响 equals 的判别。
另外,在整个代码中也有不少数据一致性的检查的,基本都是检查某个操作前后数组元素数量是不是存在差异,如果有问题那么会抛出 CME 给调用方,这也意味着这个数据结构本身是不负责同步操作的,使用者如果存在多线程调用一个 arrayMap 实例的情况,请自己做好同步处理。
OK,讲到这里我们 ArrayMap 相关的源码就已经分析完了,这里我们稍微总结一下 ArrayMap 这一数据结构的优缺点:
优点 :
在数据量小时,得益于数组缓存以及扩缩容机制,内存利用率高
由于底层是数组实现,相比于 HashMap 的迭代器实现,迭代效率明显更高
缺点
插入删除操作涉及数组整体搬移,性能开销大
查找 index 使用二分查找,相比于 HashMap,查找效率低
总结 到这里关于 SparseArray 和 ArrayMap 的源码分析就结束了,通过上文的分析,我们不难明白 Google 推荐开发者优先使用这两种数据结构的目的何在:
在 Android 系统中,内存资源珍贵,并且处理的数据量通常来讲并不大,因此基于数组的、拥有缓存机制、延迟回收机制的 SparseArray 和 ArrayMap 无疑在内存利用率上占得了先机,在绝大多数情况下无脑用就对了。
但是也正如我们在前文分析的那样,如果涉及到的数据量比较大,比如上千上万级别的 map 存储,在这种情况下,基于数组和二分查找算法的这两个数据结构就显得不那么适合了,HashMap 才是更加正确的选择。
所以,不要忽视我们日常工作中的每一个细节,实际上每一个 best practice、每一个经验背后都是非常多的努力和思考,作为开发者的我们必须要时刻保持好奇心,多问问什么,并且落到实处去做去思考,这样才能让你越变越强。